Tuesday, June 30, 2009

Technique Tuesday: Recycled Magazine Basket

recycled magazine basket 004 Large Web view recycled magazine basket 002 Large Web view

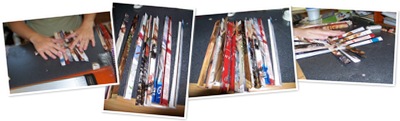
Lexi and I created this little basket yesterday out of magazine pages.  She had fun looking for “pretty” pages and 100_0990 Large Web viewthen we tore them out, cut them up and wove them into a basket.

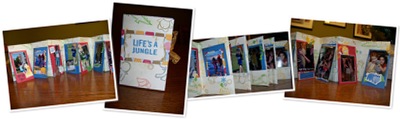
The instructions for these cute little baskets can be found here.  Since this blogger has done all of the instruction work, I am not going to repeat them here!!  Here baskets are better, but I did find that you do get better with practice, so we may just see what Maddie can come up with.

For my basket, I trimmed my pages to the full height by 7” wide.  Then cut each page to 3.5” wide by the full height before starting to fold.  My strips were about .5” wide. Finished dimensions are approximately 4.5” x 5.25” x 1.5” tall. If you want higher sides, keep the box more square and that will give you the extra weaving space.

Last note, while some may not like the staples showing, I like the outside staples.  They look like stitches, so I might take a piece of twill ribbon and glue it to the inside of the box to hide the yucky part of the staple.  But then again, I might not since I am already using the box :)

 recycled magazine basket 001 Large Web view

Oh.. and one more thing, don’t you just love the pictures of my hands that Lexi took :) Not bad for a 4 year old!

Saturday, June 27, 2009

New Workshop Pages

Last night while watching the Texas Rangers win big, I cut out and pieced all of these pages and this morning I inked and glued.  I can’t wait to run to the store and print out pictures from Lexi’s 4th birthday party and finish these off!!bella workshop 001 Large Web view

I used CTMH’s Bella level 2 paper pack.  I LOVE these papers.  I also added the color Sweet Leaf to the set as I needed more cardstock.

The patterns are all from Imagine and I used my 20 page workshop plan in order to do all of these pages.  Total time spent on 10 layouts was probably 3 hours.  That is of course including stops and starts for kids and so forth :)

My 26 page workshop is posted on this blog back in April and I just cut it down to 20 pages, it’s more manageable and you have more scraps to add to the pages with the pictures later.

I’ll post the revised workshop guide soon.bella workshop layouts five to ten

bella workshop first four layouts Large Web view

Have a great day and I hope you do something creative today!

Thursday, June 25, 2009

Thankful Thursday complete with a few trials

I love the concept of Thankful Thursday. It's something that stays with me all day, every Thursday, even if I don't post about it. Today however, has been one of those days that just hurt. What is interesting though, is that in the yuck of the day, I still have pondered thankfulness all day. So, here is what I am thinking...

1. I am so very thankful that although I feel horrible today, my growing child is constantly making me aware that she is fine.
2. I am thankful that while Maddie still has daily issues with her kidney disease and life is not and probably won't be "normal" for her, she is happy!
3. I am thankful that Lexi is Lexi. No other way to put it..
4. I am thankful for bunkbeds and Lexi sleeping all night in them!! Hallelujah!
5. I am thankful that I have a husband who loves me, everyday, all day and through anything.
6. I am thankful that my husband is a Godly man with integrity!

So yes, I am a blessed woman. But if you could, would you pray for my unspoken prayers. God's timing is best in all situations, but as a hormonal woman with 8 weeks until delivery, could you pray for a miracle in our life.

Thanks.

Wednesday, June 24, 2009

Eating/Cooking for less!!

I was reading my sister's blog this morning.. how funny is that.. we don't have to talk on the phone anymore, we just read each other's blogs... and read about a new meal planning service that she is trying out. So I headed over to the website http://www.e-mealz.com/ and read all about it and signed up!! I am really excited as I think this is something that we can really implement in our house and be successful.

If we can save money in the process YIPPEE!! but for me it's more about the planning and time management! I don't mind the cooking if I have an idea as to what to make and if we have the food to cook it. So with e-mealz that is done for me each week even so far as making a printable grocery list! I signed up for the Walmart Family Meal plan.

I'll let you know how it goes :)

Tuesday, June 23, 2009

Technique Tuesday: Life’s A Jungle Book

100_0963 Large Web view

Don’t you just love little gifty items?  I sure do!  It seems like I usually create little albums for others, but this one is for me :)

I got the pattern from a book called Making Books by Gwen Diehn.  It’s a fun book that has all sorts of patterns and ideas.

The dimensions of the book are 6” tall by 40” long.  You fold it into ten sections accordion style and have a fun little album.

To begin, I followed the pattern to get a 10” tall by 40” wide piece of paper.  Then, I random stamped Colonial White CTMH paper to match my new Animal Cookie papers by CTMH.  Once my base paper was finished, I folded it into the book and started my inside pieces.

Each inside card is 3”x5” and I just had fun with this.  I carried my animal theme onto each card and ended up with a project that I really like and know that I will create this again for gifts!


100_0965 Large Web view

Technique Tuesday: A preview for later today..

So I am waiting to pick up some pictures so that I can finish my project for today.  It is gonna be really cute :)  But in the mean time, I thought I’d give you a preview..

100_0947

I have computer training all day today and won’t be able to work on this until this evening. So, check back tonight and I’ll have the finished project posted! 

Have a great day!!

Friday, June 19, 2009

Creating a Family Heirloom

I am creating a family heirloom.. otherwise known as a heritage album for my dad for his 60th birthday that is coming up in August.  Yeah, normally these things are done secretly, but not in this family.There are just too many of us and too many memories that need to be included! 

As of today I have scanned more than 2000 pictures into the computer and have sorted memorabilia dating from the early 1900’s through today.  It is an amazing experience but just a little overwhelming!  How can you decide on what to include in an album like this??  dad pics 259

For example, we have notes written by my Grandfather to my dad during his first week of life.. those HAVE to be in the book.   

But we also have ration books from WWII, love letters, telegrams and poems written dad pics 285while my grandfather was at sea during WWII and even his autograph book prior to leaving for war.

I have learned so much about our family while going through pictures!!  I just don’t see how I am going to get all of it into one book.  And if I make more than one book, where do I stop one and begin the second… UGH!! But what a special problem to have!

One thing that has truly been apparent in all of the pictures, letters and pieces of memorabilia is the strong faith and love of family that has passed down through the generations.  My Great-Grandma spent from Nov. 1947 to Sept. 1969 writing the “Highlights on The Acts of the Apostles” it has to be more than 100 pages of single spaced typed biblical commentary.  Obviously it can’t be in the album.. but how can we not include it in some form!

Have I overwhelmed you all yet?  dad pics 237If not.. how about this.  I have a piece of hair from my Grandma’s first haircut in 1926!And I won’t even mention all of the pictures that are unnamed and unmarked that have got to be more than 100 years old!

Yes, I am absolutely loving this project!  I can’t wait to see how it will all turn out.. no telling how many pages it will be :)  The book I created for my Grandfather on the other side of the family didn’t have near this much stuff and his was 100 pages! 

dad pics 054Well, I am off to work on the book some more, but here are a couple more pictures for you..

This is my Great Grandfather taken during WWI.

The pictures below are of my dad at 8 weeks old with his parents.  My Dad’s dad wrote the commentary under these and probably 100 other pictures!dad pics 008

It’s no wonder that I have a love for scrapbooking!

Thursday, June 18, 2009

Thankful Thursday

vacation shirtLake house 2009 has come and gone.  

It is so much fun to play with family, but man am I tired by the time we get home!  With all of the family together, I am reminded how special our family is and how lucky we are that we get along and play and at the end of our vacation we still all like each other!!100_0876 Large Web viewIsn’t the “island” so cool!! We had a blast playing on our floating island.  It seated 6 adults, had 2 reclining areas, 2 ice chests, a loading dock, an anchor and even a swimming hole in the center!

100_0883 Large Web view

This year we were back on Cedar Creek Lake and the house was a wonderful size complete with 5 bedrooms, 3 full baths, 2 half baths, 4 dining tables and lots of play space.  That may seem like a lot of space but when you have as much energy and craziness as our brood, that space is engulfed quickly!!

Here a a few pictures from the adventure! See if you can count us all….  I’ll help!

The list includes:

  • Mom and Dad
  • Oldest daughter Libby and her husband Mike and their kids Carter, Abby and Dillon.
  • Second daughter, Me and my husband Doug and our girls Maddie and Lexi.
  • Third daughter Melody and her husband Brad and their daughter Sissy.
  • Fourth daughter Katy and her husband Kyle and his parents Lonnie and Cindy.

Next year we will add 3 more children to the mix!!

Tuesday, June 16, 2009

Technique Tuesday: School Keepsake Files

school keepsake file8

One day this week while at a friend’s house scrapbooking, I saw wonderful keepsake files that she had created for her girls. 

I knew that this would be a great solution to all of the masterpieces created by my kids that I have no room to store!  So off I went to the store for the supplies and here are the results!!  keepsake file Large Web view Yes, Maddie is helping to create her own box.  She is at the age were she not only wants to help, but wants to tell me how to do it!  What am I saying, she has ALWAYS been at that age!!

We created the girls’ names and some of the embellishments on my Pazzle at school.  I really do like that thing, I just forget about having access to it!

If you have a need to store a lot of memorabilia, this is a wonderful project for you!

Friday, June 12, 2009

A Couple of Sneak Peeks

Here is a sneak peek at the project I created for the next Technique Tuesday post! I finished it this morning so it would be ready for viewing while we are on vacation! 

I hope live writer works and the full post will be available on Tuesday :)

Here is the sneak peek!school keepsake file8   Did you notice the other sneak peak?

Tuesday, June 9, 2009

Technique Tuesday: Another envelope album

Okay, so today is that day during the week where I try to create something new and fun.. however, instead of playing, I cleaned.  If you have never had the joy of trying to keep a house spotlessly clean with kids, let me send you mine and you can try.  I was thinking last night that if I could perfect the art of keeping a house show ready and still allow my children some playtime in the house, that would surely be a noteworthy technique.  Alas, I couldn’t so I’ll just share one of my creations from last year.

babyboyalbum004I know, some of you will have already seen this, sorry.. but I so love the envelope album that I hope I can inspire you to start giving these gems as gifts.  

One of the coolest things about an envelope album is that you can use any size or style of envelope. This one is created from traditional invitation size envelopes. I like this size best since you can use 1 sheet of 12x12 paper for so much of the book! Your total cost of the album is relatively low if you can keep your embellishments in check.

All of my supplies are from Close To My Heart.  This is one of my favorite paperpacks, but it is no longer available for purchase.  However, some of the new CTMH papers are similar and I know that I will LOVE playing with them!!

Here are some of the close ups of the album.

Let me know if you have any questions.  Since I have posted previously as to how to make an envelope album, I didn’t bother to here.. however, I would be happy to answer questions.

Monday, June 8, 2009

Locks of Love

locks of loveA few weeks ago Maddie decided to cut her hair and was happy to find out that she could send her hair to Locks of Love.  So, 11 inches later, Maddie had 2 ponytails ready to be mailed.  I finally got around to taking her picture with her donation and we are mailing her hair to be made into a wig for a child today!

Saturday, June 6, 2009

Celebrating with “the girls”

This morning I had the pleasure of having brunch with my mom, my sisters, my aunts, my grandmother, my mother-in-law, my daughters and my nieces.  It was quite the girl fest!

We were celebrating our baby girl that should arrive sometime before the end of August.

We all gathered at my sister Melody’s house, had a wonderful feast and then had a ball laughing at stories from the past.  The stories were supposed to be about a funny event as a parent.. but like many stories they evolve into sister stories.  When you are one of four girls and your mom is one of four girls, that makes for a lot of special memories.  Grandmother can get a story started and it all goes down hill from there :)

One days like this, I am reminded how truly blessed I am to have such a wonderful family. The bond of sisterhood that my mom and aunts have has now been passed down to me and my sisters.  How exciting to know that I am passing down the sisterhood tradition with my girls.  However, I must say, please God… just 3 girls.  Let my youngest sister Katy have the 4 girls!!

Thursday, June 4, 2009

Thankful Thursday: 5 year anniversary in our house

Five years ago today we packed up the house in Azle and moved back home to Stephenville.  I can not believe how quickly five years have passed.  We went from moving around a lot (6 houses in 5 years) to stability.  It’s no wonder that this house feels like home.

We have also done a lot of work to the house over the last five years.  In fact, we have changed almost everything.  Here are a few before pictures.  You will notice that I was pregnant then too!

 july27_00082004_0519july400062004_0514june280002late august 04 006  

And here are some after shots.  Funny thing is, I started painting Lexi’s room today.  This will be the third color in five years :)

 front of house 002 backyard11

dining2 second bedroom 005

I look forward to what the next five years holds for us and am interested to see where we will be living.  We could very possibly be in this same house.  No telling how many more paint colors could come our way!

Tuesday, June 2, 2009

A Book for Baby

Over Lexi’s first year, I made her a Monday book.  It was an idea that I saw from a fellow scrapper and loved.  Every Monday, I took a picture of her and chronicled in pictures her first year.  We love looking at this book and in fact, it’s the only scrapbook Lexi currently has, so I am very glad I made it.

Here are a few pictures from Lexi’s book.

Knowing that life is going to be even MORE CRAZY with baby #3, I decided to create the “monday book” ahead of time.  NO, I haven’t put dates in it!! However, I have already put in the weeks as those are a given :)

Here are few pictures from this baby’s book.  I can’t wait (well, yes I can..) to add all of the details!

Happy crafting!

Technique Tuesday: Embossed Handprint Watercolors

I love handprints. All handprints, but especially of my children. I can’t believe how quickly time passes. Yesterday I saw a fun post at my friend Megan’s blog, and thought I’d give it a whirl, but with my kiddo’s handprints instead of an initial.

Here are the finished results:
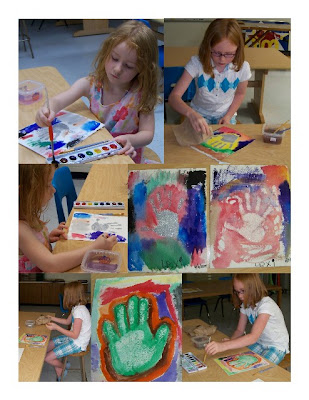
This is a fun project that my kids age 4 and 9 were able to do almost entirely on their own!

To make this project you need..

  1. VersaMark inkpad
  2. Embossing powder. The first handprint we tried using Ultra Thick Embossing Enamel, but it was too think I think. See Maddie’s clear handprint. The embossed handprint doesn’t have enough texture with the UTEE. So next up we used silver and then just fine clear for Lexi’s second handprint. These powders worked much better and allowed for the lines in the hand to show even when the powder was set.
  3. Craft heater
  4. Watercolor paper
  5. Watercolors and paintbrushes.

To begin, have your child ink their hand (or do it for them) then smoosh the hand really well onto watercolor paper and completely cover with embossing powder. Use the craft heater to set the powder.

Now the kids can start painting. Personally, I think you get better results if you have the kids dampen the entire page with plain water and the brush first and then start with the colors. This allows for much more uniform blending. 
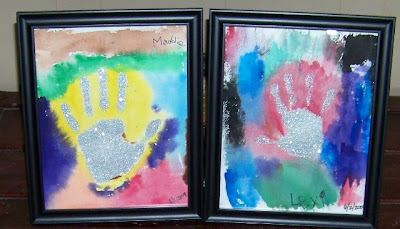
Once the pictures are complete, don’t forget to have them signed and dated. 
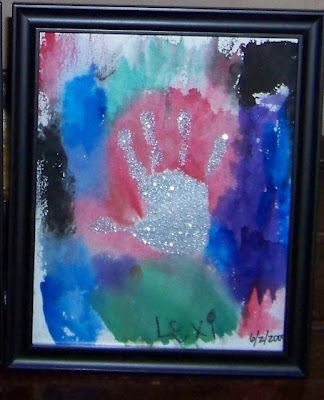
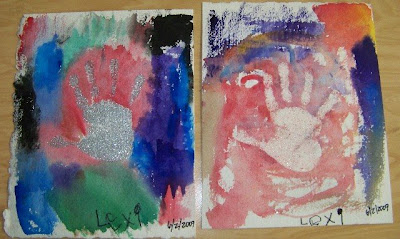
Finally, allow to completely dry and frame.
And there you have it! Another edition of Technique Tuesday…